Prehistory
Since my NAS
revival project last year, I already had in mind to try the
link aggregation feature, which was supported by my router. Initially I expected simply to pair up integrated
Realtek RTL8111C NIC controller with
Intel PRO/1000 GT PCI adapter as I already had one in the pile of my parts. For this purpose I even bought an Akiwa
GHP-PCI106H PCI riser card (I use their
GHB-B05 case) which wasn't so trivial to find - it was available in several industrial PC online shops only and, because they communicate exclusively with the juridical entities I needed to go through an intermediate party to buy it. When everything was ready, I believed that it would be a relatively straight forward setup. However, it ended up in a quite longer story than expected.
 |
| Akiwa GHP-PCI106H PCI riser card |
Initial plan failed
The aforementioned configuration failed immediately after I attached the PRO/1000 GT adapter. I hit an old JNF76 motherboard BIOS issue that expansion cards with their own firmware may clash with ADPE4S-PB SATA II daughterboard, rendering the system completely unbootable. Intel's card had one with PXE boot support. This limitation have never been fixed by Jetway, thus I have no knowledge of any solution to resolve the situation. Unfortunately, it was clear that this configuration was a no go.
 |
| Intel PRO/1000 GT PCI network adapter |
Looking for new solutions
One hiccup didn't deter me from completing the project though. It pushed me to look for other possible options to go around the limitation. Most likely the simplest way would have been to find another NIC adapter which wouldn't clash with the daughterboard. That meant buying the card without PXE boot support. As a proof of that, I have successfully tested an old VIA based Fast Ethernet (100Mbps) PCI network adapter. Indeed, it didn't clash with ADPE4S-PB on BIOS POST process and it was perfectly working in the Linux environment. Although this option looked quite appealing initially, there were few Realtek based GbE adapters in the market, however their description tended to be vague at times and I felt that I may have ended up buying yet another incompatible card. More than that, the whole link aggregation idea was also a bit risky and it might have left me with the second GbE network adapter buried deep in the pile of old parts. Because of all of this, it made me rethink of the NAS configuration a bit, which would solve another outstanding issue.
 |
| ADPE4S-PB SATA II controller |
Reasoning for ADPE4S-PB replacement
The main reason for the configuration change was the same ADPE4S-PB daughterboard. Besides those clashes with expansion cards and a bit of challenging configuration, I was also experiencing another very annoying issue with it. I used this controller to attach SSD with the host OS only. Relatively soon after I made it work and boot the system, I started to face unstable behavior during the Linux boot process. From time to time Arch Linux was failing to initialize the SSD, forcing me to the reset loop till the successful attempt. Few times I was spending up to an hour on clicking reset button... I haven't figured out the actual reason for this, but it could have been everything from the driver to the bad cable connection (my SSD's SATA plug is physically damaged) or improperly attached daughterboard. It led me to the decision to replace ADPE4S-PB board with the LAN expansion daughterboard instead. I chose an AD3INLANG-LF module which hosts three Intel 82541PI based network controllers, the same used by PRO/1000 GT adapter. It was readily available through amazon but I required some help from a friend in the US to deliver it to Europe. For an SSD drive I decided to use my old Delock PCI USB/SATA combo card.
 |
| AD3INLANG-LF daughterboard |
Inserting AD3INLANG-LF daughterboard
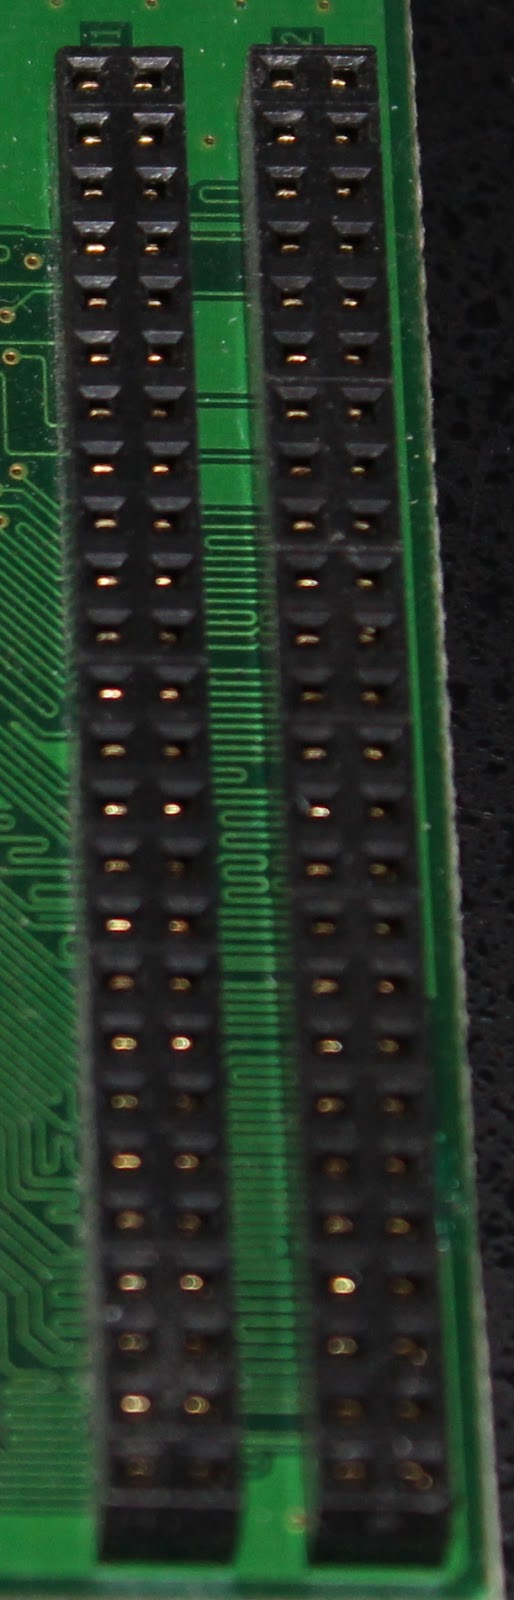
Since I attached the SATA daughterboard many years ago, I already forgot how actually tricky is the process of inserting it to proprietary JWDB header. For some weird reason Jetway doesn't provide the manual and you can find that at least a few people are complaining about the attaching process in product reviews, blog items or forums, some taking even quite extreme measures to make it seat properly. If it's not, the daughterboard either will fail to work completely or it can even light up (for example, green light on LAN port if cable is attached) but non of the interfaces will be identified or initialized in the OS or BIOS. Nevertheless, the actual process shouldn't require much force, using the trial-error approach, I have managed to insert it properly by aligning inner pins (means the ones closer to CPU side) with the plug holes on the daughterboard in a 30-45 degree angle and sliding it in a circular motion and a slight force into the second row. You can actually feel a small resistance when it goes into the header. Once properly seated, you can even try to lift it up gently, it shouldn't move out of place or fall to any side from its own weight. Also, you can check pins under the daughterboard: they should be evenly aligned on both sides and almost touching the header's plastic.
 |
| JWDB connector on ADPE4S-PB daughterboard |
|
|
|
|
|
|
Finally, you can enter BIOS setup and check if three new boot ROM options for LAN interfaces (Addon Intel Lan1 to Lan3) appeared in the Integrated Peripherals -> Onboard Device Function section (not sure if it appears for Realtek based daughterboard as well). In case of SATA daughterboard, it would show it's own BIOS screen for the RAID setup.
 |
| New entries in BIOS after inserting AD3INLANG-LF daughterboard |
Delock PCI USB/SATA combo card
89140 Delock PCI card combo USB2.0/eSATA/ATA has 1xSATA, 1xESATA, 1xIDE and 4xUSB 2.0 ports. SATA/IDE is
based on VIA VT6421A SATA RAID controller and USB 2.0 is managed by VIA Vectro VT6214L USB host controller. Similar to the Marvell controller on ADPE4S-PB daugtherboard, VIA VT6421A doesn't have a built-in support in Arch Linux and requires to load additional kernel module. Some resources were mentioning satavia name, however Arch Linux uses sata_via with the underscore. So I modified the /etc/mkinitcpio.conf file by adding sata_via module to MODULES=(sata_via) line and regenerated initramfs (mkinitcpio -g /boot/initramfs-linux.img). After the reboot, the controller was successfully recognized and it was now possible to boot the OS from it. The USB controller was recognized without any additional configuration though, but it doesn't support loading OS from it (at least, not on JNF76 motherboard). Although, it may seem as a drastic downgrade to
already subpar SATA II controller but an SSD performance is still
significantly faster than any USB 2.0 flash drive I have used before for
the same purpose (it reaches ~80MB/s for writing and reading from my
testing). Most importantly I haven't faced SSD initialization issues with it which saves lots of headache on system reboot process. Unfortunately, I can't make a comparison to ADPE4S-PB as I have never done or recorded performance tests for it and I realized that after finishing my current setup only. As mentioned in the previous chapter, reattaching modules is quite a complicated and time-consuming process, so I am not keen to do it just for testing purposes.
 |
| Delock PCI USB/SATA combo card |
|
AD3INLANG-LF speed test without link aggregation
As described previously AD3ILANG-LF daughterboard consists of three Intel 82451PI Ethernet controllers. It is a 32-bit 3.3V PCI 2.3 based controller, which supports 33MHz and 66 MHz speeds. Controllers were identified as GI version instead by Linux (the difference is the manufacturing stepping of the controller, where GI is manufactured in B1, PI in C0 stepping). lspci -v output for one of the controllers can be seen below:
04:04.0 Ethernet controller: Intel Corporation 82541GI Gigabit Ethernet Controller (rev 05)
Subsystem: Intel Corporation PRO/1000 MT Network Connection
Flags: bus master, 66MHz, medium devsel, latency 32, IRQ 18
Memory at dfac0000 (32-bit, non-prefetchable) [size=128K]
Memory at dfaa0000 (32-bit, non-prefetchable) [size=128K]
I/O ports at 9c00 [size=64]
[virtual] Expansion ROM at dfa00000 [disabled] [size=128K]
Capabilities: [dc] Power Management version 2
Capabilities: [e4] PCI-X non-bridge device
Kernel driver in use: e1000
Kernel modules: e1000
While my external Intel PRO/1000GT card uses a 33 MHz interface, all three controllers in the daughterboard are attached to the 66 MHz PCI. Many years ago I thought that Jetway proprietary interface is just a modified conventional PCI but apparently it is bridged to PCI-E interface which allows to combine few PCI interfaces under one connection.
I tested the speed of copying one 1.6 GB size file through samba 4.8 (Arch Linux to Manjaro Linux). My main computer was using 10-Gbit Tehuti 4010 PCI-e x4 rev2 based controller (
Edimax EN-9320SFP+) connected to the same router as the NAS server (using 10G SFP+ DAC cable). The hard drive in use was portable
Transcend Storejet 500 SSD drive connected to USB 3.0 port (internal reading speed 6.9 GB/s, writing 2 GB/s). On the NAS side
TOSHIBA DT01ACA300 3TB hard drive was attached to native VX800 SATA II controller without any RAID setup (reading ~137MB/s, writing ~98.5 MB/s). Both systems were using ext4 filesystem:
Integrated (Realtek) interface: 53.8 MB/s
Inner (left) interface: 80.7 MB/s
Middle interface: 82 MB/s
Outer (right) interface: 80 MB/s
The left and right interfaces of the daughterboard were showing quite a similar constant ~80MB/s speed, while the middle interface was minimally faster at around 82 MB/s. Integrated RTL8111C interface was copying file at 53.8 MB/s speed.
 |
| Edimax EN-9320SFP+ |
Link aggregation
Finally it was the time to setup link aggregation. I enabled the 802.3ad link aggregation feature on my router and was ready to start NAS configuration. However, once I thought that the worse times were behind, I stumbled onto bonding driver configuration issues which led me to try link aggregation on the NetBSD first.
NetBSD
Since I wanted to confirm that my Linux configuration struggles were not caused by the router, I checked if NetBSD supports link aggregation. It appeared that it does and the setup process is relatively easy. As I always have installed NetBSD system on the WD Elements Portable (10A8) USB hard drive (NetBSD 8.0 at the time of testing), I just plugged it in to the system's USB port and booted from it. Thankfully, the system loaded without any issues, but was just relatively slow because of USB 2.0 speed limitations. I was following the
official manual page and
this article to setup link aggregation. There is no need to recompile the kernel, as the default (GENERIC) amd64 kernel already has enabled agr pseudo-device in its configuration.
I literally repeated all the steps from the man page:
/etc/rc.d/dhcpcd onestop #stop the DHCP client
ifconfig wm0 inet xxx.xxx.xxx.xxx delete
ifconfig wm0 inet6 fe80::xxxx:xxxx:xxxx:xxxx delete
ifconfig wm1 inet xxx.xxx.xxx.xxx delete
ifconfig wm1 inet6 fe80::xxxx:xxxx:xxxx:xxxx delete
ifconfig agr0 create
ifconfig agr0 agrport wm0
ifconfig agr0 agrport wm1
/etc/rc.d/dhcpcd onestart #start the DHCP client
Once dhcpcd (DHCP client) service started, to my surprise aggregated interface was correctly configured, the router immediately changed aggregation status to enabled. Network was working properly, thus, I could access both my router and the Internet. There was no point to test copying speeds, because USB 2.0 interface was the major bottleneck, however I successfully managed to copy a few files to my main computer using scp protocol. This proved that I was doing something wrong in the Linux environment and that link aggregation actually works between NAS and router.
 |
| ifconfig agr0 output |
Arch Linux
Arch Linux has a great documentation on many topics in their wiki page. Bonding is not an
exception as well. Basically, configuration is not complicated at all: just copy /etc/netctl/examples/bonding file to /etc/netctl/bond0 and configure aggregated interface according to the example. The only difference is to check how your interfaces are called (for example: ip addr list) and replace them in the BindsToInterfaces section accordingly. To be sure that I was configuring the right interface, initially I connected the cable to each of them one by one, and checked which one was configured by DHCP. One additional change was bonding mode. By default Linux uses the round-robin policy instead of the 802.3ad. Therefore, Mode=802.3ad line needs to be added as well. The final configuration looked like this:
Description="A bonded interface"
Interface=bond0
Connection=bond
BindsToInterfaces=(enp4s6 enp4s4)
IP=dhcp
Mode=802.3ad
commands. From the first glance everything seemed fine: new bond0 interface actually appeared, it was up and correct IP was assigned to it. However, pinging to the router was failing and aggregation status was still disabled. It took me two evenings to realize that the problem was dependent on the DHCP client. This
was great in providing additional information on bonding and gave me a hint on troubleshooting the issue. The cause of the failing network was old lease files in /var/lib/dhcpcd folder for aggregated interfaces. Because of this dhcp client was configuring not only bond0 interface but each aggregated interface separately as well. It confused the network and it was failing to route through the right interface. It was enough to delete all *.lease and run dhcpcd client manually for bond0 interface. Since it was properly and automatically configuring bond0 interface even after reboot. Finally network aggegration was working as intended! It can be recognized by the same MAC address between bond0 interface and aggregated ones, IP address assigned only to bond0 interface and "master bond0" on aggregated interface description (ip addr list):
I performed the same test for the aggregated interface as I did for each NIC controller separately by copying the same 1.6 GB file through samba. To my disappointment, network bonding actually added quite a big additional overhead and was way slower than each interface was performing independently. In general, copying speed was from 58 to 62.5 MB/s which is just about ~10-16% more than the integrated NIC controller and over 20% less than independently working 82541PI controller. Copying 2 files at the same time reduces the speed almost by half for each file so total speed is still basically the same (possibly it's already also a hard drive limitation). According to wikipedia, 802.3ad gives fault tolerance and load balancing, however it does that in expense of performance. If those features are more important than it's worth the hassle, however if speed matters possibly balance-tld or balance-alb modes should be investigated. Unfortunately I didn't have time to play with those modes yet as they need a bit of a different setup (router's link aggregation needs to be actually disabled). If I will do though, I will create a shorter article on that as well.
I started this project in my blind belief that bonding will give me bigger speeds, thus I didn't spend enough time on research. Like RAID setup, network aggregation also has different modes for different purposes. The 802.3ad standard is currently the one widely supported by routers. However, it is actually slower than individual interface and provides fault tolerance and load balancing instead, which may or may not be important for your setup. If you are looking to increase your transfer speeds, probably balance-tld mode should be tested. But even in this case, you shouldn't forget that most of the switches, computers and routers are still limited to 1Gbit Ethernet, so even doubling the speed can't actually saturate doubled speed link. Finally, if you are using a magnetic hard drive, they can be a bottleneck as well. Before network bonding setup, you could also possibly consider RAID1+0 setup. In general, the link aggregation feature is not for everyone and you could investigate if it's worth your time, money and hassle. For me, it was mainly an interesting experience and the good reason to fix my outstanding NAS issues. This journey wasn't easy but it gave me valuable information for future configurations and eased me from previous headaches I have suffered from.