2020-09-22

Information about Vortex86 EX2 SoC

This year I got a chance to acquire one of the first DM&P Vortex86EX2 SoC based system (ICOP VEX2-6427-5C4NE specifically). Comparably to my article about DM&P VortexDX3 SoC, I assembled the short article with the information which I had gathered from sources like dmesg, /proc/cpuinfo (NetBSD, SparkyLinux),  datasheets, official web sources and images.


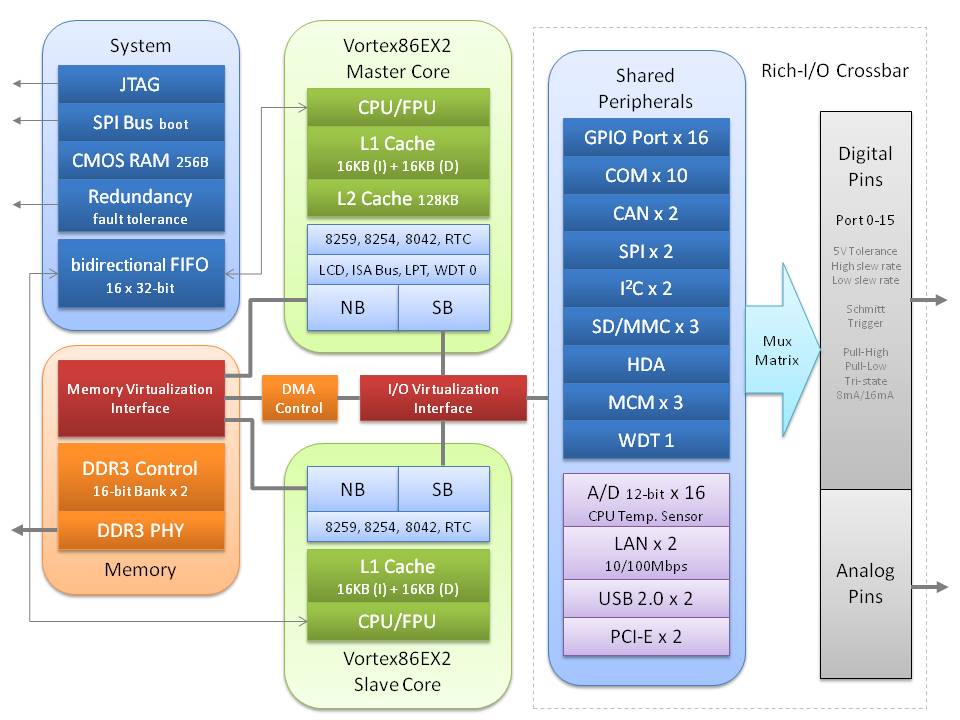
Below you can find the main Vortex86EX2 specifications (mainly taken from the official page, but supplemented by some information from BIOS and operating system messages, as well as hardware info):

  • Identified as DM&P A9133 in BIOS.
  • Master/slave design, two independent cores (as per my understanding, they cannot be used in the same Operating system at the same time).
  • CPUID is 0x38504d44 (not sure yet if only the master one only or both).
  • Frequency is up to 600MHz for the main core and 400MHz for the secondary one.
  • 6-stage pipeline (both).
  • 2x DMA controller (both).
  • Integrated FPU (both).
  • 16KB I-Cache, 16KB D-Cache (both), 4-way 128KB L2 Cache with write through or write back policy (main only).
  • DDR3 control interface, up to 2GB RAM, 16-bit data bus, 2 ranks, clock support up to 400MHz, supports ECC.
  • Real time clock (both).
Shared:
  • 65 nm manufacturing process.
  • HD-Audio (Realtek ALC262 is used in my system).
  • 2x USB 2.0 (ID: 6061) + USB device (PCI ID:1061).
  • ISA bus interface (PCI ID: 6013):
    • AT clock programmable.
    • 8/16 Bit ISA device with Zero-Wait-State.
  • Up to 3 SD/MMC cards (my board has one on the SoC module and one on the board). Supports SDSC, SDHC and SDXC. eMMC is also supported, up to version 5.1.
  • 2x CANbus 2.0A/2.0B.
  • 2x SPI controller.
  • Up to 10x COM ports.
  • 2x Fast Ethernet (10/100Mbps), my board has 1xR6040 model 6.
  • 3x Motion Control Interface.
  • Crossbar interface.
  • 128 programmable I/O pins (GPIO).
  • Temperature sensor.
  • Package: 19x19mm, LFBGA-441.
  • Operating temperature -40 to 85℃.
Vortex86EX2 System Block Diagram
Vortex86EX2 Specs and Block Diagram

According to /proc/cpuinfo CPU supports CMPXCHG8B, CMOV, FXSAVE/FXSTOR instructions, MMX and SSE, SSE2 and SSSE3 extensions, even NX bit (using PAE?), thus seems to be the most advanced DM&P SoC in this regard. It also supports page size extension (4MB), physical address extension (PAE),  SYSENTER/SYSEXIT instructions and time stamp counter. Because of above it can be likely classified as i686-compatible CPU (it loads i686 Linux kernel successfully). FPU is built-in on both cores. It does not have integrated GPU, thus external is needed (company is offering Vortex86VGA mini PCI-E card solution). My board has 4 USB 2.0 ports, but two of them provided by Genesys Logic's GL850G hub controller (USB ID: 0x0608). Additional information also can be found in CWID report in cpu-world.com (report has apparently incorrect halved cache sizes). /proc/cpuinfo can be found below.

/proc/cpuinfo (combined from NetBSD 9.99.69/Sparky Linux 4.19.0-6-686):

processor    : 0
vendor_id    : Vortex86 SoC
cpu family    : 6
model        : 0
model name    : Vortex86EX2
stepping    : 2
cpu MHz        : 600.032
physical id    : 0
siblings    : 1
core id        : 0
cpu cores    : 1
apicid    : 0
initial apicid    : 0
fdiv_bug        : no
f00f_bug    : no
coma_bug    : no
fpu        : yes
fpu_exception    : yes
cpuid level    : 3
wp        : yes
flags        : fpu pse tsc msr pae cx8 apic sep pge cmov pat mmx fxsr sse sse2 nx cpuid pni ssse3
bogomips    : 1200.06
clflush size    : 32
cache_alignment    : 32
address sizes    : 36 bits physical, 32 bits virtual
power management:


CPU-Z 1.94.0 screenshot
(through wine, L2 is not detected properly)

Note: There is no way to boot into slave CPU on my board, so all actual information is based on master one.

2020-05-06

Beware of ahci module change from dynamic to built-in on Artix (Arch) Linux


Recently, after one of the usual system updates, I suddenly ended up with an unbootable system on my Artix based NAS server. Since the system's boot process is not the most stable in general, initially, I thought it was yet another "moody" day for the system caused by the Marvell controller on ADPE4S-PB daughterboard. However, the boot is usually successful in several attempts in this case. If not, rarely this was caused by failed initramfs generation during the update process. In such situations, I was regenerating it by booting into Artix (or previously Arch) installation system and chrooting into the main system (or using fallback initramfs boot option). This procedure requires reconnecting the system drive to VIA based controller. Nevertheless, nothing was helping to bring it back to life. I started to suspect that I was dealing with the new issue this time. Initial speculation was geared to failing old hardware, but in the end it appeared to be a software based issue. Since then, I successfully booted into the system using the VIA integrated controller, it was getting obvious that modules configuration was not being applied for some reason. I confirmed that by looking at the lspci output which didn't show the AHCI driver being applied for the Marvell controller.


A little investigation revealed that the new kernel has ahci.ko.xz and libahci.ko.xz module files missing in /usr/lib/modules//kernel/drives/ata directory. They were present there before the upgrade. Since I depend on the AHCI driver specific property, the reason of the failure was pretty clear. Despite that, I didn't know yet why those modules had been missing. Regardless, I was looking for the fastest way to restore my system first. The first solution I came up with is to revert to the previous kernel. It appeared to be possible due to the fact that pacman package manager is keeping older packages in pacman cache. Using command "pacman -U /var/cache/pacman/pkg/linux-5.5.10.artix1-1-x86_64.pkg.tar.xz" downgraded kernel and, fortunately, the system was bootable again.

The downgrade solution was supposed to be temporary, since I can't ignore upgrades forever. Initially, I assumed that the missing modules were a mistake so I filed a bug report. However, it was soon closed with explanation that ahci modules are built-in in the kernel and it's not a bug. I believe this change happened starting 5.6 kernel series since 5.5 based kernels were still working for me. Because of this, I made an attempt to apply corresponding configuration of dynamic modules on kernel. Thankfully to the good Arch Linux online documentation, it was easy to find required information. This page describes how to pass module parameters to the kernel and this one describes the GRUB bootloader configuration. To pass module parameter "module.param_name=param_value" needs to be passed to the kernel line. Blacklisting is performed by passing "module_blacklist=module_name" parameter. In my specific case, I needed to pass marvell_enable=1 property value to ahci driver and blacklist pata_marvell module. So, these steps needed to be performed in my case:
  • sudo vi /etc/default/grub
    • change GRUB_CMDLINE_LINUX line to:
    • GRUB_CMDLINE_LINUX="ahci.marvell_enable=1 module_blacklist=pata_marvell"
  • regenerate grub.cfg by running sudo grub-mkconfig -o /boot/grub/grub.cfg
It should be safe to keep both: grub configuration and previous configuration for dynamic modules. They should not interfere with each other and would be ignored depending on using either built-in or dynamic module.

Unfortunately, this solution didn't work as well as expected. Though I was able to boot into the system, the success ratio decreased to an unbearable level. Only 1 out of 5 to 7 attempts were partially successful. By that, I mean the system booted and I could interact with it, however, none of the attempts initialized all the hard drives correctly. It was either system one or one of other two hard drives in LVM RAID failing. Thus, RAID volume wasn't mounted at best, or system was failing to boot at worst. Quite often, the system disk was still not recognized early in the boot process leading to rescue shell. Because of that, I was forced to revert to the old kernel again.

Considering that I didn't manage to fix the issue, I am not sure if there is a workable and stable solution at this point. Manually built kernel with modularized ahci module may help, but it would mean that I would need to track kernel upgrades myself. Moreover, building Linux kernel is not a very trivial process as I wish it should be, so it is not a viable option for me. As a temporary solution I can completely disable Linux kernel upgrades and keep the other software up-to-date. However, as a long term solution, it may force me to look for another distribution which still uses AHCI as module or even to consider a complete hardware update. Only time will tell which one will be easier to implement.

In conclusion, if Arch Linux based system is used along with Marvell 88SE6145 SATA controller (or any other marvell controller which requires ahci module specific configuration), I currently advice to refrain from upgrading to 5.6.x kernel. One can try to experiment with kernel parameters as described above, however, it is advisable to make a backup image of the system beforehand, so it can be easily restored. The downgrade path may not always be successful because of other dependencies and should not be relied on.

2020-02-29

2019 in review


Starting last year I resumed writing yearly review after a long break. Since 2019 was no less active in various personal computer related projects, I believe it may start a tradition of such retrospective reviews for the years to come. So without further ado, I will move on the last year's activities.

Downgrade from Radeon RX 460 to Radeon R7 370

For almost two years, I used the AMD Radeon RX 460 GPU based Asus Dual RX460 OC edition graphics card. However, since 2019, I started using NetBSD much more regularly alongside with Manjaro Linux (which is still my primary OS) and, unfortunately, Radeon RX 460 GPU is unsupported by the former. Because of that, I decided to downgrade to an older generation hardware, so I can be comfortable in using them. After a broad research, I opted for the GIGABYTE GV-R737WF2OC-2GD which is a Radeon R7 370 based card. R7 370 uses Pitcairn Pro GPU core based on the 1st GCN architecture. The main motivation behind choosing this specific model was its similar performance to RX 460, its reasonable price and its availability in stock at local stores.

Despite some fears, the card didn't disappoint. NetBSD immediately recognized the GPU and applied proper drivers giving the expected hardware acceleration. Because of this, I started using NetBSD on my desktop quite regularly. To my surprise, it visually felt more responsive than RX 460 on Linux as well. Despite being an older model, its performance is actually at par with the replaced card in general usage, except possibly increased power usage.

Dell QLogic 57810 10G Ethernet card

Since my router supports one SFP+ 10Gbit Ethernet port, I was curious to try it out and bought the Edimax EN-9320SFP+ 10Gbit network card back in 2018. Though, being the cheapest 10Gbit solution at that time with the smallest card around, it had few annoying flaws. The card was based on Tehuti TN4010 NIC, which is poorly supported by the alternative operating systems except Windows. Any of the BSDs don't have a driver at all. Linux has one, but not in the mainline kernel. Thus, the Linux driver needs to be compiled and installed manually, and the process needs to be repeated almost after every kernel update (which happens relatively often). In the end, the Linux driver still had at least one issue - if computer goes to standby mode, NIC stops working after resume with only reboot bringing it back. Nevertheless, I was not planning to replace it, since alternatives were too expensive (especially Intel based solutions). Btw, Edimax also have never updated the driver in their page, I was using the one from github.

Unexpectedly though, one local shop offered Dell QLogic 57810 (Dell part 540-BBGS) dual port 10Gbit network card for a sizable discount. I checked that it was supported by at least FreeBSD, the Linux kernel had mainline kernel driver as well, so I took the bait and bought it. The card itself is much bigger than Edimax, having an active cooler and requires PCI-E 2.0 x8 slot instead of PCI-E 2.0 x4. On the other hand, it is a way more professional product having sophisticated firmware and two SFP+ ports. Once installed, it worked out of the box in Windows, Linux and FreeBSD, with no manual work required. Contrary to Tehuti NIC, it had no issues on resume in Linux as well. In general, I believe this purchase was pretty successful, except the fact that it is not supported by NetBSD.

I dream to port the FreeBSD driver to NetBSD, however, it may be too complicated task, since the driver is huge. Nevertheless, I am planning to make an attempt this year (sometime in 2020) and see what happens.
Dell QLogic 57810 dual SFP+ Ethernet controller

Toshiba MG04ACA600E and D-Link DGE-528T

Yet another hardware update was already extensively described in my blog. Though, the main goal was just to upgrade from 3TB hard drives to 6TB ones in my NAS server, it ended up with the bigger project from migration to Artix Linux to LVM RAID configuration on recycled 3TB drives.

The new hard drives were two identical Toshiba MG04ACA600E model drives which showed quite visible performance improvement in read operations but write speed seemingly was restricted by driver issues and showed only minimal improvement compared to older drives. Thanks to LVM RAID0 setup I also reused older 3TB drives as additional back-up storage.

Realtek RTL8169SC based D-Link DGE-528T network card was used to circumvent loss of the second Ethernet port. Together with integrated Realtek 8111C NIC it showed worse network speed over Intel based daughterboard card, but it was expected and acceptable downgrade.

Toshiba MG04ACA600E

Sanwa MA-TB41S trackball

For around ten years I was successfully using Kensington Optical Orbit trackball. It was bought in Sweden by my former colleague and friend. Initially I thought that it will stay only as an experiment, but proved to be one of the best devices I've ever used. Unfortunately, the right button started to fail so badly by the end of the last year, that I was finally forced to look for the possible alternative. Despite pretty limited trackball options, I must admit it was one of most challenging decisions on hardware selection process. The main reason for that was the lack of possibility to try them physically. I believe, there is a great risk of to buy uncomfortable trackball from the images only. It doesn't matter how much reviews you will read, there are too many factors which can affect the comfort, from your hand size to device quality and sensitivity. That is probably the reason why you can find so many contradicting opinions on the same product.

Theoretically I could even buy the same model, since Kensington is still selling it together with few other long-living models, but I wanted to find one with the scroll wheel. After long research I narrowed down the options to these three models:
Though, Sanwa trackball was my last choice, I ended up buying it because of difficulty to find Elecom model in Europe, and relatively bad reviews regarding the quality of Kensington trackball buttons. Unfortunately, I can't tell yet if I made a right choice... During, the first month I was really disappointed. The trackball appeared to be a bit too big for my hand, making it difficult to reach buttons comfortably. Quite often I was accidentally moving the ball before clicking mouse buttons, thus easily missing intended button or other UI element. Scroll wheel was too slow, too big and clunky. My hand was constantly getting tired. Nevertheless, I started to get used to it over the time, thus decreasing the strain of the hand and increasing precision. Though, the scroll wheel still stays as the biggest inconvenience, since it was the major feature I had been looking for. It works, but scrolling is very slow and reaction time after rotating the wheel visibly lags behind. Furthermore, my thumb gets painful and tired easily, even over the time I haven't really gotten used to it. Honestly, I am not sure, if I will keeping using it, I may switch to a regular mouse or try the Kensington Orbit trackball with the scroll ring. It is probably the most unsuccessful hardware purchase in 2019.

NetBSD

I was quite active in the NetBSD project community this year: I managed to port IC Plus IP1000/1001 PHY driver from OpenBSD (used by many VIA EPIA boards, also IC Plus own network cards), fixed support for VIA VX800 (and possibly VX855, VT8237S) SATA controller (previously partially working in IDE mode only), 4World USB to Serial adapter (already mentioned in 2018 review), found the fix for the Biostar X370GT5 SATA controller locking issue, requested to pull-up the fix for D-Link DUB1312 USB network card to NetBSD 8 release. In addition, I noticed and identified the applied fix for the long standing bug on Ryzen system, where the OS was failing to identify a second SATA hard drive. This bug was causing to stall even UEFI POST process on reboot. Fortunately, this fix made it into NetBSD 9.0 release. Also I noticed some typos and white-space issues in the code. Finally, I updated the seemingly abandoned Codelite IDE package in pkgsrc to build the latest stable version at that time (from 9.1 to 13.0). Despite these successes, I also had some let-downs. I couldn't fix the USB and Ethernet issues on eBox 3352DX3-AP computer. I found a workaround to make Ethernet controller work, in case SMP and ACPI is disabled, but the proper fix is still unclear. Besides that, once suddenly Fnatic Gear Rush keyboard stopped working, with the help of NetBSD developer I identified that it was caused by accidental switch to 6KRO mode. It appeared to be working in NKRO mode only (which was the opposite up to NetBSD 7.1 release). Hopefully, it can be fixed to work on both modes in the future. Seeing quite a successful last year, I hope that I will be able to solve some issues in 2020 as well.

eBox 3352DX3-AP 

The last chapter I will dedicate to some insights on how to run BSD system on eBox 3352DX3-AP VortexDX3 based system, since I promised that on the last review.

FreeBSD 12.0 works the best out of BSDs, which can perfectly boot on default BIOS configuration. The only issue is the integrated network controller (R6040) which fails to work. This issue is common to all BSDs, since drivers are based on FreeBSD one. Similarly to the described below workaround on NetBSD, it may be also applied for the FreeBSD. By removing all the vte_reset() calls in the driver and recompiling a custom kernel, it should make the network work. Unfortunately, the latest release at time of writing (12.1) introduced some regression which causes instant failure on boot. I submitted the bug report but I don't expect it to be resolved soon. So, in case FreeBSD is a preferred choice, I recommend to run 12.0 release. Alternatively to editing and compiling the custom kernel, USB based network controllers can be used to enable the network.

OpenBSD is probably on the worst situation. I identified only one way to boot into the system without kernel recompilation by disabling "ACPI aware OS" option in BIOS. However, neither USB nor Ethernet works, which renders the system usefulness limited to some local automatic jobs only. It can boot with ACPI enabled/IDE in legacy mode by recompiling kernel without DIAGNOSTIC option. SMP works in both cases. If you want to work with OpenBSD for any reason, I would recommend to look for the system with COM ports (or try to solder the one).

NetBSD support is somewhere in the middle among the three. In order to boot the system with "ACPI aware OS" option enabled in BIOS, IDE should be set to "legacy mode". Otherwise, various timeout exceptions will occur and system will fail to boot. Similarly to OpenBSD, neither USB nor network will work in this case but both CPU cores (SMP) will work without requirement to rebuild the kernel. Booting with ACPI and SMP disabled (boot -12) will give USB support. Furthermore, it is possible to make network work in this case as well, but removing vte_reset() calls in if_vte.c (R6040 driver) and rebuilding your custom kernel. In case loosing SMP and ACPI are acceptable options, it makes a fully working system. Unfortunately, a workaround for the network didn't work for OpenBSD (more specifically, it actually does work, but network still fails to connect due to some other issue).

Summary and 2020

2019 was a pretty good year in the hardware/software context. Most of my projects went smoothly, and newly acquired hardware met or even exceeded expectations (except the trackball). It was also the most active year in NetBSD for me. Besides starting using it as Desktop operating system quite regularly, I managed to provide several patches to improve hardware support and provided my first contribution to pkgsrc project. I hope to keep this pace in 2020 as well, though time-constraint is my main enemy. Hardware wise, I don't have specific plans for 2020. I may upgrade to a newer Ryzen CPU and upgrade some other parts but non of these are a high priority. Like last year, such decisions probably will depend on pricing and unexpected deals. I do plan to revive my Alpha CPU based Microway PC164 Screamer system and I already have bought "old new" 8x32MB modules of SIMM RAM (Samsung KMM53616000AK-6) for it. Considering all these future plans, I believe that I will write at least a few articles this year, which I hope will be an interesting read.

2020-02-19

Kwort Linux 4.3.4 review

In my endeavor to revisit lightweight Linux distributions I looked back on my old dream to try CRUX Linux distribution. Since my last attempt ended up in failure, I decided to look if there were any CRUX-based distributions around with the simplified installation process. With the help of DistroWatch.com filter I found that only two CRUX-based distributions existed. Between two of them, the Kwort Linux seemed like the one I may have been looking for. There were few uncertainties though:
  • It wasn't clear if I would also need to build kernel during installation process similar to CRUX distribution.
  • At that time the project homepage was down despite its relative recent release (2019-06-16), casting doubts if it will be maintained in the future.
  • I wasn't sure how distribution's kpkg package manager operates, and if it is still maintained. Finally, I didn't know if I would be able to use CRUX ports system alongside with it. I believe together with BSD style init system it makes an essence of CRUX Linux and support for it was one of requirements to CRUX based distribution as well.
Nevertheless, I downloaded the ISO image from linuxtracker.org with the intention to try it out on my VIA EPIA-M900 motherboard later on. The ISO image is around ~917 MB in size. Fortunately, before my attempt, the homepage was partially restored with the documentation available in github (by the time I finished an article, the homepage is fully recovered and updated). It provided answers to some of those uncertainties except maintainability prospects of this small distribution. CRUX ports appeared to be supported to a certain extent, installation process didn't require to recompile the kernel as well. Furthermore, I also checked that kpkg mirrors were still updated regularly. All those factors combined gave a decent reason to try Kwort Linux.

The Kwort Linux did not have a "real" installer so to speak. Once booted, it automatically logins into console and gives a long message on the installation process. It can be always reprinted using "helpinstall" command. All the steps are manual: 1) first step is to partition the hard drive using one of fdisk/cfdisk (for MBR) or gdisk/cgdisk (for GPT) utilities. In my case I didn't need to partition hard drive since I just reused partitions used by previously installed SparkyLinux. 2) format partitions using mkfs. command; 3) mount those partitions to /mnt/install/ for root and /mnt/install/ for other partitions (if any); 4) run pkgsinstall command to install base packages; 5) use jumpOS command to chroot to your newly installed system; 6) finally configure your system by editing /etc/fstab, /etc/rc.conf (vim editor was available), creating users and installing bootloader (lilo or grub2 options are available). After all these steps, system installation is finished and computer can be rebooted.

In my case everything went smoothly and the newly installed system booted successfully. By default, kpkg package manager doesn't have any repositories, so the first command requires to install one. europa.kdb is available after installation and can be installed using kpkg instkdb /root/europa.kdb command. Alternative ctrl-c.kdb mirror was available here. After that, package manager is pretty simple to use kpkg update && kpkg upgrade will upgrade the system. Unfortunately, the package manager doesn't handle dependency management, thus, issues appeared right after the first upgrade. Several applications were failing to start citing missing library files. In all cases, I solved it by reinstalling those libraries. However, the challenge was to find the right package, as at times, few libraries were needed to be reinstalled before application started to work again. Another issue is that kpkg is pretty limited. During the time of writing this article, it had 203 packages only.

To partially circumvent missing packages, CRUX ports can be used. To achieve that, initially you need to install packages from CD image kpkg install /mnt/cdrom/packages_more/ports/*.tar.gz. After that, just refer to CRUX ports documentation. Unfortunately, not everything successfully compiled too and during kpkg upgrade, packages may interfere if versions doesn't match. Nevertheless, I successfully used ports system to install some applications unavailable in kpkg package manager mirrors (like wget). As a last resort, I compiled some packages manually from original repositories (like openchrome video driver).

To run Xorg you just need to run startx command. It did not seem that there's any display manager available as well. The default window manager is Openbox combine with conky and tint2. There are some distribution specific shortcuts like alt+z to lunch urxvt or alt+x to launch the browser. Actually, no alternative to Openbox was available in kpkg, though ports system provided some.

Probably, the final point is that though the kernel binary was provided during installation, no kernel updates are available. So, in order to update it, compiling manually is necessary. The installer provides 4.19.46 version in the ISO image. I successfully updated to 4.19.88 soon after installation.

In conclusion, I can say that Kwort is a really different distribution compared to the mainstream. It requires more manual work and research but in turn it gives one of the leanest systems available, fast boot process and complete control in your hands. It is suitable mainly for the experienced Linux user or the person who is not afraid to tinker with his/her system. It can be a perfect distribution for your secondary PCs, testing and rescue purposes or on dual boot as well. For desktop usage, one should have quite minimal requirements, since running typical heavy weight applications or games may be a challenging task. Here there is a nice response from a distribution creator and developer, along with its features and goals. It also has an IRC channel on OFTC network where you can reach him directly.
Default Kwort Linux 4.3.4 desktop

2020-01-27

Beware of QAFF CPU on X79 platform

This article is probably not very relevant anymore, considering the age of the platform and rarity of the CPU, but nevertheless, it can be useful for historical purposes or if someone happens to have the CPU mentioned below. Back in 2012 I bought X79-based Sandy Bridge-EP platform (based on ASRock X79 Extreme4-M motherboard) together with the engineering sample CPU having a QAFF S-Spec (supposedly 4-way Xeon E5 which doesn't have corresponding production item). Though the CPU was recognized by the motherboard and system initialized successfully, over time however, it proved to be quite unstable and stressful to use. Two main issues were:
  • Initial system boot and even reboot process could randomly freeze with a different number of BIOS beeps or motherboard boot status codes (Extreme-4M has a specific LED indicator for them). Probably the most common final code before freeze was 0x67 - CPU DXE initialization (CPU module specific). I believe it could have been RAM detection/initialization issues. Unfortunately, I couldn't find any pattern to reproduce the failure consistently.
  • PCI-E graphics cards with v3.0 specification (possibly v2.0 as well) lead to the failure of the OS boot process into graphical environment (Windows 7, Gnome on Manjaro Linux, etc). Reducing PCI-E mode to version 1 in BIOS settings was partially solving the issue by stabilizing the boot process. In this case however, the system had an occasional performance degradation and/or random lockouts. I was using Radeon RX460 graphics card, but I found a MSI forum thread confirming the similar issue with different graphics cards (including AMD and Nvidia models).
The first issue is hard to investigate because of its inconsistent behaviour, however, the system usually worked better with two RAM modules instead of four, in my experience. Shuffling RAM modules between slots occasionally was solving the issue, but temporarily only.

The second problem was easier to identify since the problems started soon after I replaced older Radeon 2400PRO based graphics card with more modern Radeon RX460 one. Windows boot process locked out immediately on first reboot after AMD drivers were installed. Linux boot process froze as well on loading display server (X.Org). In both cases, the only way to continue was to reset the system. By default, BIOS was selecting PCI-E v2 for the graphics card. Reducing PCI-E to version 1 helped to load the desktop environment in Linux but system performance was unstable up to complete system lock out. Windows was still crashing regardless of the PCI-E mode set in BIOS. Explicitly setting PCI-E v3.0 in BIOS was rendering system unbootable until CMOS was cleared. It seems v3 was either not supported by CPU at all or it didn't work in combination with my motherboard.

X79-based systems are already considered legacy since long ago and it is not very likely that someone will decide to build it these days, especially with a quite rare engineering sample CPU. In this case though, my recommendation is to avoid QAFF S-Spec CPU and choose many other options supported by the motherboard.

2019-12-07

LVM RAID on Artix Linux

This is a follow up article to activities started with the migration from Arch Linux to Artix Linux distribution. Since the switch over to OpenRC based distribution was successful, I decided to move on with hardware changes soon after.

Motivation

The major goal was to reuse the replaced 3TB hard drives into RAID0 setup as additional backup storage, those combined capacity would match to newly acquired hard drives. I faced some challenges during implementation:
  • Akiwa GHB-B05 Mini-ITX case can only physically fit two 3.5'' hard drives, and both places were already occupied by the main two hard drives.
  • There are only two SATA connectors available on the Jetway JNF-76 motherboard.
  • I wanted to keep using network aggregation, thus I need to have two Ethernet ports available. The motherboard has only one, though.
  • If possible, I wanted to avoid additional expenses or keep them to a minimum.

The plan

To remedy the space limitation issue, I decided to place the hard drives outside instead, by reusing my external hard drive box and HDD radiator designed for 5.25'' bay for each hard drive accordingly. Both, the box and the bay provided a stable vertical position and can be placed close to the case, making it accessible to cables from inside the case. I have accumulated all the required cables throughout the years, so no additional purchases were needed.

To get additional SATA ports I was forced to replace my AD3INLANG-LF LAN expansion daughterboard with the ADPE4S-PB Marvell SATA controller (it is based on Marvell 88SE6145-TFE1controller). I was a bit reluctant about this decision, since I was facing constant boot issues in the past with it. It also needs special configuration to make it work on Linux. Moreover, the Jetway proprietary daughterboard connector makes it challenging to insert the board firmly. Finally, loosing LAN ports meant that I can't use network aggregation without additional PCI card. However, the only alternative was to buy a new PCI SATA controller with at least 3 SATA connectors, which is getting harder to find and the prices are not too attractive in my region. Additionally, it's hard to predict if such decision won't bring new problems along the way. So, I decided to go with the daughterboard exchange.

In order to keep network aggregation possible I needed to do one purchase. Since Intel PRO/1000 GT PCI network card from my stockpile is not compatible with the ADPE4S-PB daughterboard due to firmware clash, I needed to buy another one without network boot support. For that purpose I acquired the D-Link DGE-528 (Rev. C1) network card which is based on Realtek RTL8169SC NIC. It costed me around 7.5€ and kept the goal for minimal spendings.

Additionally, I reused one back plate panel containing 2xSATA to eSATA connectors with one 4-pin Molex power connector, one SATA and one eSATA to SATA cable. All of them I had in the pile of my parts.

Assembly

Initially, I made sure that I have enough power cables and I can extend them long enough outside the case, so that hard drives would stand vertically, stable and still with enough room for cables not to be stretched. Fortunately, I still had one free Molex connector, which I used to connect the back panel's power connector. It made it extremely easy to connect one of two hard drives, since both power connector and eSATA connector were redirected outside the case. However, the second one couldn't be connected in the same manner, because it needed one more power connector. Fortunately the PSU had four SATA power connectors, out of which one was long enough to go outside the case and reach the hard drive. So in the end, I had all four PSU's SATA power connectors used (1xSSD, 3xHDD) plus one Molex connector used for the back panel's power cable extension (1xHDD). The back panel also provided ability to attach one of the hard drives using eSATA to SATA cable. Since I had only one such cable, I used long SATA cable to attach the second hard drive from inside of the case.

Externally placed hard drives cabling
Once cabling was finished, I spent quite a long time to properly attach the daughterboard itself. Like in the past experience, the boot process was very unstable, but after multiple attempts I reached a quite reasonable stability with most of boot attempts successful. Unfortunately, I noticed one regression over Delock controller: attempts to read Kingston SSD temperature with hddtemp utility was causing it to fail (with the reboot required).
Cabling at the back plane

The easiest part of the assembly was attaching D-Link network card to PCI slot and cable cleanup. As expected the DGE-528 didn't clash with the daughterboard and it is well supported by Linux. Integrated SATA controller needed to be switched to IDE mode to avoid the clash as well.


Hard drives in external casing

RAID0 Configuration

The main goal was to setup two 3TB hard drives into RAID0 mode, so that they will be available as one virtual 6TB drive. This volume would match with my newly bought 6TB drives and act as yet additional backup storage. To achieve this, I tried to use Marvel firmware first, but unfortunately it was freezing up on RAID creation attempt. I couldn't figure out the reason, but it didn't seem like it was a capacity limit, since 6TB hard drives were detected by the controller without issues. Some drive incompatibility looked like more plausible explanation but I had no means to test and verify my assumptions. As a consequence, I decided to try to setup LVM managed RAID instead. Using two sources from Gentoo Linux wiki and Red Hat Linux documentation I successfully configured my LVM RAID0 by using these commands:
  • Install and start LVM service:
    • sudo pacman -S lvm2 lvm2-openrc
    • sudo rc-update add lvm boot
    • sudo /etc/init.d/lvm start
  • Create LVM physical volumes and volume groups
    • sudo pvcreate /dev/sda1 /dev/sdc
    • sudo vgcreate nasbackupvg /dev/sda1 /dev/sdc
    • sudo vgs #to check
    • sudo vcreate --type raid0 -l 100%FREE -n nasbackuplv nasbackupvg
  • Format and mount volume using XFS filesystem:
    • sudo mkfs.xfs /dev/nasbackupvg/nasbackuplv
    • sudo mkdir /mnt/raid
    • sudo mount -t xfs /dev/nasbackupvg/nasbackuplv /mnt/raid
  • Edit /etc/fstab by adding the line (in order to mount volume on boot):
    • /dev/nasbackupvg/nasbackuplv            /mnt/raid    xfs    defaults,relatime    0    4 
Once RAID setup was ready and working, I also edited my rsync scripts to accept destination path and updated my crontab configuration to sync with the new mount point. With this step, the goal to reuse hard drives for backup was successfully achieved.

I also performed some performance metrics of all attached drives:
  • sudo hdparm -tT /dev/sdX and dd if=/dev/zero of=output.img bs=8k count=256k:
    • Seagate 3TB (attached to Marvell controller)
      • Timing cached reads:   1000 MB in  2.00 seconds = 500.18 MB/sec
      • Timing buffered disk reads: 320 MB in  3.00 seconds = 106.52 MB/sec
      • 2147483648 bytes (2.1 GB, 2.0 GiB) copied, 39.3878 s, 54.5 MB/s (for RAID setup Toshiba+Seagate)
    • Toshiba 3TB (attached to Marvell controller)
      • Timing cached reads:   1002 MB in  2.00 seconds = 500.75 MB/sec
      • Timing buffered disk reads: 326 MB in  3.01 seconds = 108.44 MB/sec
      • 2147483648 bytes (2.1 GB, 2.0 GiB) copied, 39.3878 s, 54.5 MB/s (for RAID setup Toshiba+Seagate)
    • Toshiba 6TB (both attached to VX800 controller)
      • Timing cached reads:   1012 MB in  2.00 seconds = 505.75 MB/sec
      • Timing buffered disk reads: 528 MB in  3.00 seconds = 175.78 MB/sec
      • first HDD: 2147483648 bytes (2.1 GB, 2.0 GiB) copied, 18.6864 s, 115 MB/s
        second HDD: 2147483648 bytes (2.1 GB, 2.0 GiB) copied, 15.9705 s, 134 MB/s
    • Kingston SSD (attached to Marvell controller)
      • Timing cached reads:   982 MB in  2.00 seconds = 491.40 MB/sec
      • Timing buffered disk reads: 324 MB in  3.01 seconds = 107.47 MB/sec
      • 2147483648 bytes (2.1 GB, 2.0 GiB) copied, 36.0755 s, 59.5 MB/s

Network aggregation

Network aggregation reconfiguration was required as well as a result of hardware changes. Instead of using AD3INLANG-LF daughterboard with three Intel 82451PI network controllers, I utilized the integrated Realtek 8111C controller and PCI attached D-Link DGE-528T network card with Realtek 8169C NIC. The integrated one was named as ens1 and the D-Link one as enp4s3, so configuration was the following:
  • nmcli con delete bond0 # deleting previous interface
  • nmcli con add type ifname bond0 bond.options "mode=802.3ad" 
  • nmcli con add type bond ifname bond0 bond.options "mode=802.3ad" 
  • nmcli con add type ethernet ifname ens1 master bond0 
  • nmcli con add type ethernet ifname enp4s3 master bond0
It worked as expected but the transfer speed reduced to 40-43 MB/s compared to >50MB/s which Intel NICs were usually achieving. Regression was expected and observed in the past, acceptable for current usage scenarios.
D-Link DGE-528T

Conclusion

In general, the plan went quite successfully. I managed to reach all the goals with minimal spendings and effort. They were few issues like multiple attempts to attach daughterboard properly, Marvell firmware RAID creation failure but I managed to circumvent them in one way or another. Some performance metrics are not stellar but they are sufficient for home NAS usage at present day. Though, I believe that it is the last major hardware update around this motherboard, since I am reaching the limits with this decade old platform. The next step would require more modern solutions but by that time the current system will still serve me well.

Arrangement of PC and hard drives

2019-11-01

Migration from Arch Linux to Artix Linux

Recently I reached the point where 3TB hard drivers were getting almost full and I needed an upgrade. As a result, I opted for two Toshiba MG04ACA600E 6TB hard drives which replaced Toshiba DT01ACA300 and Seagate Barracuda ST3000DM001 3TB models. They were successfully recognized by the Jetway JNF-76 motherboard, on which my NAS server is based on. As a matter of fact, VIA AHCI/RAID firmware always properly displays them in SATA II mode (max speed for all VIA controllers AFAIK), which wasn't the case with the previous setup when one of the drives randomly would drop to SATA I. In general, there is nothing to complain about them, hopefully they will be reliable too.

Toshiba MG04ACA600E

This upgrade and few unexpected free days made me rethink both software and hardware configurations again and come back to the original question of the Linux distribution to be used. Probably one additional kick was the news about Project Trident decision to move from FreeBSD-based TrueOS to Void Linux, which made me revisit some light-weight distributions, init systems and file systems. I was even considering to try NetBSD with OpenZFS but quite soon this plan faded away due to lack of experience on managing OpenZFS filesystem. Initial testing showed that I can easily destroy my data and before such a move, I should be really confident with it. Even though I was very much satisfied with Arch Linux setup too, I was itching to try some systemd-free distribution instead, which gives me more natural and familiar way of work. The relatively recent consolidation of Arch and Manjaro OpenRC spinoffs into Artix Linux caught my major attention for the obvious reasons. It is still based on Arch, which provides a more familiar environment, spirit and tools. The distribution officially supports OpenRC and runit init systems. I chose OpenRC one, created migration plan, and started the journey.

First boot

To make sure that it boots and recognizes my hardware, I downloaded the latest artix-base-openrc-20191009-x86_64.iso image which I could find at the time of migration in one of their mirrors. System booted without issues and recognized all the required hardware, pata_via module probably was compiled into the kernel since I didn't need to configure it separately, contrary to the Arch Linux. Setup included JFS and XFS mounting option support which was required for my data disks. It reassured me to go forward since I didn't find any potential setbacks.

The plan

To minimize a potential regression impact, I decided to prepare a transition plan. It wasn't very detailed, since it did not describe all the specific commands but it pointed out general actions I would need to perform:
  • Backup /home and /etc/fstab
  • Backup samba, crontab, modules and network settings.
  • Boot into Artix setup and backup Arch system disk (it has dd included).
  • Install Artix itself
  • Install/configure required software and services: samba, wget, rsync, git, fossil, jfsutils, xfsprogs, rtorrent, lm_sensors, hdparm, hdtemp, ethtool, vim, vi, man, openssh.
  • Restore /home, crontab
  • Configure network
  • Configure mounting points to data drives
  • Install/configure powerd

Migration

The initial step was to prepare backup for all settings, /home folder and Arch Linux system disk itself. Individual settings files were simply copied manually one by one, and /home folder was synced using rsync utility. For the Linux system disk backup I booted into Artix setup and used dd utility together with gzip compression utility to copy all the system disk (dd if=/dev/sda conv=sync,noerror bs=64K | gzip -c  > /mnt/nasbackup.img.gz). This step probably took the longest time wise, preparing compressed image of 240GB SSD drive took way longer than I was expecting (hours). Probably it was related to limited performance of the system itself.

Once all backup were ready, I moved on to the installation part. The Artix installation process was based on the steps from distribution's wiki Installation and Migration sections so I won't go much into details. It was almost smooth process except that the base installation didn't have any editor installed, and this led me to install Vim editor first before I could do any required configuration (right after chroot command). Probably the only mistake by following the documentation was the NetworkManager installation where I should have preferred Gentoo's netifrc modules with dhcpcd utility instead.

Rebooting into the newly installed system gave few more surprises on how minimal the setup was. Even quite basic applications like hostname or man were not available. Though it was easily solved by installing inetutils (for hostname) and man packages using pacman package manager, however, it still felt a bit strange, since I believe Arch base install had more software. The list of my installed packages includes:

sudo pacman -S wget rsync git fossil jfsutils xfsprogs rtorrent lm_sensors hdparm hdparm-openrc hddtemp ethtool vim vi man openssh openssh-openrc samba samba-openrc cronie cronie-openrc powerd powerd-openrc inetutils

Besides that I also installed grub, os-prober, networkmanager and networkmanager-openrc during the initial installation process. However, as mentiond above I may replace NetworkManager with netifrc modules and dhcpcd utility in the future.

As you may have noticed, all services have -openrc counterpart for OpenRC service management. OpenRC service files are installed in /etc/init.d for execution and /etc/conf.d for configuration. After that service needs to be added to a certain execution level (I used default for all) using rc-update add command and they can be started by rc-service start command. Services I have added include:

sudo rc-update add NetworkManager default
sudo rc-update add sshd default
sudo rc-update add smb default
sudo rc-update add cronie default
sudo rc-update add cpupower default 
sudo rc-update add hdparm default

The next step was to configure the network aggregation. Since I installed NetworkManager, I needed to use nmcli utility to setup bonding network interface (ensure that all interfaces are down and leases are deleted from /var/lib/NetworkManager/*.lease before proceeding):

sudo nmcli con add type bond ifname bond0 bond.options "mode=802.3ad"
sudo nmcli con add type ethernet ifname enp4s4 master bond0 
sudo nmcli con add type ethernet ifname enp4s6 master bond0
sudo
nmcli con up bond-slave-enp4s4
 
sudo nmcli con up bond-slave-enp4s6 
sudo rc

With dhcpcd utility it would have been a slightly different story (ensure that all interfaces are down and all leases are deleted from /var/lib/dhcpcd/*.lease before proceeding):

sudo pacman -S dhcpcd dhcpcd-openrc
sudo rc-update add dhcpcd
sudo ln -s net.lo net.bond0
vim /etc/conf.d/net
    config_enp4s4="null"
    config_enp4s6="null"
    slaves_bond0="config_enp4s4 config_enp4s6"
    config_bond0="dhcp"
    mode_bond0="802.3ad"
sudo rc

Finally, I completed my setup by restoring my home folder content, crontab and samba configuration files. Migration ended up to be easy and problem-free. With backup time excluded and ignoring some confusion during network configuration, it probably didn't take me more than few hours of work.

There are some caveats though which I noticed but I am clueless as to the cause and if it actually affects the system in any way:
  • Multiple segfault messages in dmesg (not sure yet, what causes these messages but it doesn't seem to affect any of the required functionality as of result): openrc-run.sh[2008]: segfault at 8 ip 00007fdfbfb890dc sp 00007ffd4de79040 error 4 in libc-2.30.so[7fdfbfb37000+14d000]
  • Warning message for bond0: "Warning: No 802.3ad response from the link partner for any adapters in the bond". This may indicate the router issue or premature warning message, but apparently the bonding interface works correctly (and router indicates it as active).
In conclusion, I can say that the OpenRC init system actually feels more intuitive and simple than systemd, but the maturity of Artix distribution is still not on par with systemd-based Arch Linux. Errors in boot messages, inconsistencies and confusing information in wiki page and even the web page itself are the signs of that. Nevertheless, for my simple NAS server requirements this distribution seems like a perfect fit and I believe I will stick with it unless stability-wise it won't prove itself. Arch Linux was very stable and polished in this regard despite its rolling release nature, I expect no less from Artix as well. If anybody would ask me for a recommendation, I would still recommend using the Arch Linux distribution, unless, that person would prefer using the systemd-free distribution for whatever reason (in that case Gentoo and Void would be a primary choice I guess). Yet, I believe Artix has a potential to become one of the strongest light-weight distributions, especially for those seeking simplicity and freedom of choice.

Planned hardware changes

Though the migration went successfully, I still have some possible hardware changes in mind. First of all, VIA based PCI controller is not compatible with the SSD I am using, which triggers a workaround in the driver to reduce transfer rate to ~60 MB/s:

ata3: Incompatible drive: enabling workaround. This slows down transfer rate to ~60 MB/s

Secondly, I am planning to reuse replaced hard drives as yet additional backup solution in RAID0 setup (which in turn will make them 6TB in total).

Because of these changes, I am considering to revert to using ADPE4S-PB SATA II daughterboard. It means checking its compatibility with Artix (hopefully the same or a similar configuration to Arch Linux will work) but I fear about the boot process stability which improved consideribly once I switched to Delock controller. However, the daughterboard can provide enough SATA interfaces for the system drive and two hard drives without hindering too much to the overall system performance (it is based on faster PCI-E interface and it supports SATA II 3 Gbit/s transfer speed). In addition to that, I will need some creativity on attaching those two additional drives, since I don't have space in mini-itx case anymore. Probably I will need to keep them outside by using some extentions to reach the hard drive SATA connectors. The main concern is that the SATA power connector is too short to go outside the case. I hold my breath on Molex to SATA adapters. For keeping them outside, I will try to reuse my old external 3.5'' HDD cases. We will see how this goes...

To keep the network aggregation I also bought a cheap D-Link DGE-528T (Rev. C1) network card with high expectations that it will successfully work with the daughterboard contrary to Intel PRO/1000 GT card, since it should not have any interfering firmware. It is based on the Realtek RTL8169SC controller, which I would pair up with the integrated Realtek RTL8111C controller. Performance-wise, I do expect some degradation compared to AD3INLANG-LF daughterboard, but this is acceptable.

D-Link DGE-528T
I am planning to write a new article if this project goes successfully.